opts_test <- c(
"way too complicated and they did bot work",
"very complicated, although the instructions did work",
answer = "straightfirward to follow, I did suceed", "easy to follow, but unfortunately it did not work"
)2 Setup
This setup works as a Githup repository and the instructions are written such that the resulting book is published as html via a github page. I therefore assume that you have a github account and that your RStudio (or possibly Positron) is setup to talk to your Github account.
Also, the following workflow is surely not the only one that achieves the aim of having a Quarto Book with Webexercises functionality. However, amongst the many I have tried this one seems to work (and thankks for ChatGPT for guiding me up a few blind alleys but also helping me to eventually find a solution). That is good enough for me.
I am working on a Windows computer.
2.1 Create Github repository
On Github create a new repository with the name of your project. My project here is called QuartoBook-with-Webexercises-Template. It is best to add a readme.rmd file.
2.2 First pull
Once you created the repository, establish the connection between RStudio and the repository. In RStudio create a new Project. Use the from Git option and copy in the url of your github repository. Once you are through the setup process you should see any files you had in te repository (e.g. the Readme.rmd file) in your “Files” tab.
In the top right of the RStudio window you should see the name of your project, in my case the same as the GitHub repository name.
2.3 Setup Github for publishing
As the resulting book is published via a Github page you should setup the repository for that. First we create a new branch in Github. On this occasion I do this in the online Github page of the repository.
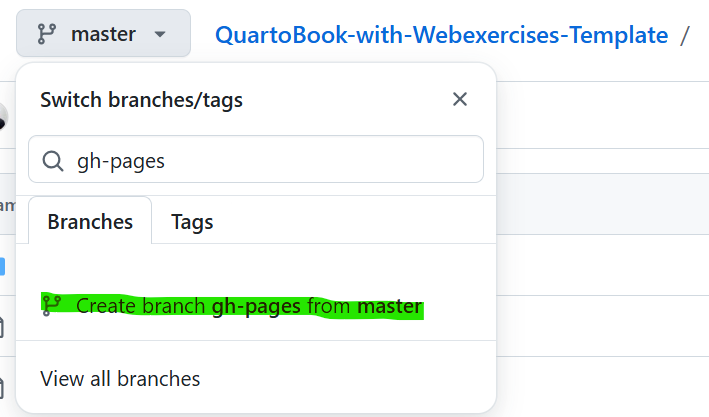
I call this branch gh-pages.
Now we need to tell Github that you want to publish the book from that branch. Go to your repositories setting and go to Pages
Once you have done that we can tell Github to publish from that branch.
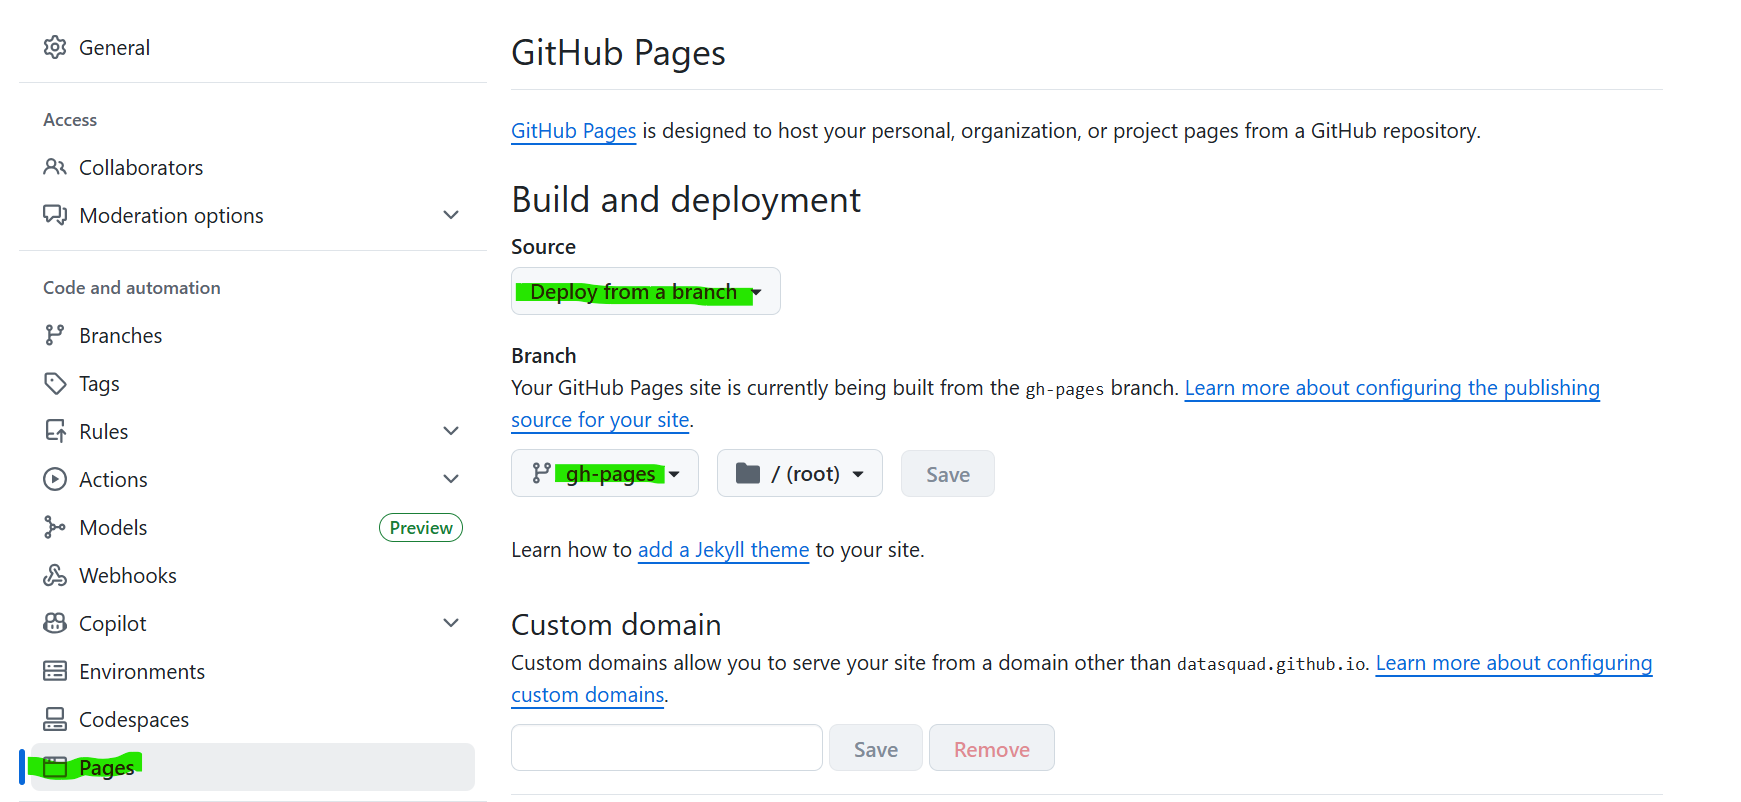 This completes the Github setup required.
2.4 Create Quarto book
Now we wish to create a Quarto Book Template. We do that from RStudio. Go to the Terminal. There you should see that RStudio has connected to your Github repository, most likely the prompt will end by (master) which indicates which branch you are in right now.
Type quarto create project book.
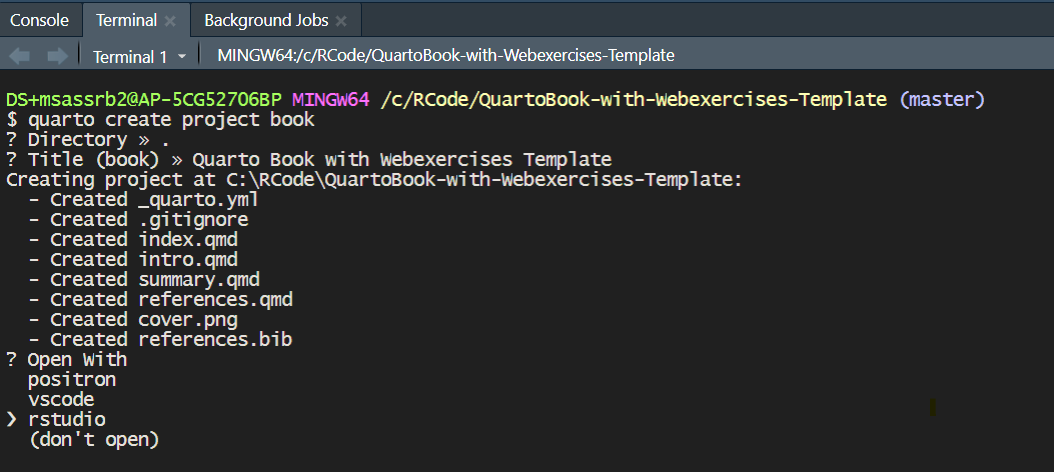
This will trigger a short dialogue. It will first ask you for a directory and by typing . you indicate that you want the book to be created in your current directory.
It will then ask you for a book title. Here I chose the same name as the project name. Then it will ask you how to open the project and I am asking for the Book to be opened by RStudio.
Once you have completed this dialogue a Quarto book template will have been created.
2.5 Adjusting _quarto.yml
This step may or may not be required for you.
Open the _quarto.yml which you should see in your folder. This is the file that basically stitches together the book from chapter files.
The file will look something like this:
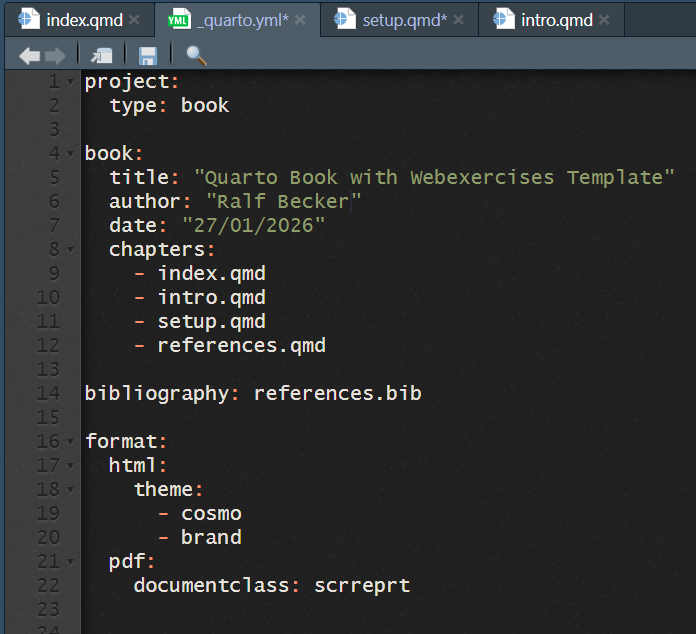
You can see Author, title and date info you can adjust and a list of the chapter qmd files. There is also information on which format the book should be formatted in. We will soon make some important adjustments here.
For now I will delete the last two lines “pdf: documentclass: scrreprt” as I have no need for the pdf version (and frankly because my tex version is for not not setup right). So delete these two lines and safe the file.
2.6 Render the Book
Go to the RStudio Terminal and type quartp render --clean. This should go through the process of creating html files from the quarto (.qmd) files in which you edit the pages. Of course so far you only have the default pages (index, intro, summary and references).
In your project folder you should now see a subfolder “_book” which contains evertyhting required to display the book. There is no need to look at it right now.
2.7 Push to Github
Now that you have added files to the folder we can test that the upload to Github works. As we are working in the (master) branch we will push to that. I usally do this with the following three commands from the RStudio Terminal
git add -A, which stages all changesgit commit -m "SHORT COMMIT INFOO - ADJUST, to commit the changesgit push, which pushes the changes to your online repo.
You can now check in your online Github page to confirm that it contains all your pages.
2.8 Publish on Github
The above merely added any changed to the master branch, but recall that we set above that the repository should publish the book from the gh-pages branch. This is now done as follows. Go to the RSudio Terminal and type
quarto publish gh-pages
When asked whether the site should be updated answer “y” for yes. This will update the gh-pages branch with the current state of the material and make the online Quarto book available on the url as indicated below.

2.9 Setting up for Webexercises
So far we have merely gone through the normal setup and updating for a Quarto book. In order to make use of the interactive elements offered by webexercises, additional work is required. They require extra css and js (java script) code.
Go to the RStudio console and load the webexercises package (assuming that this has been installed previously).
library(webexercises)
Now, sill in the console, execute the following command:
add_to_quarto(quarto_dir = ".", include_dir = "include")
This creates a new folder called “include” in your main project folder and places two files into that folder, webex.css and webex.js. These provide the necessara java script and formatting information for the nice webexercises functionality.
2.10 Adjusting webex.js
It is my experience that you now need to make an adjustments. Open the webex.js file in the RStudio editor. You should see something like the following:
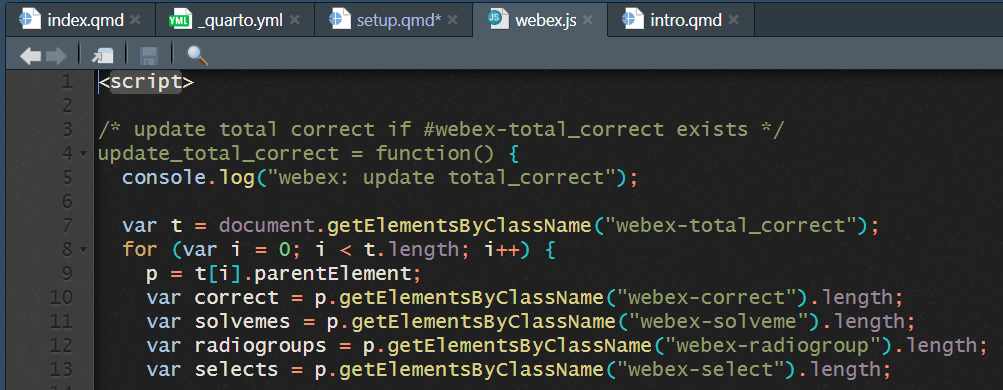
If the first line of the file says <script> (as in the example above), then you will have to delete that line of code as well as the last line of code which will say </script>.
Then save this file without changing its name.
Next you will have to create a new file within that same “include” folder. In RStudio go to “FILE - New FILE - Text File”. This will open a blank text file. Paste the following into that file:
<script src="include/webex.js"></script>
then save that wile as “webex-after-body.html” (in the include folder). You should now see three files in the include folder.
2.11 Adjusting _quarto.yml
Now we need to instruct Quarto to make use of the extra css and js code we have prepared. This is done by adjusting the “_quarto.yml” file. Open this and add the following two lines to the html formatting instructions in that file:
css: include/webex.css (should already be there after running add_to_quarto())
include-after-body: include/webex-after-body.html (needs adjusting)
That file should now look like this:
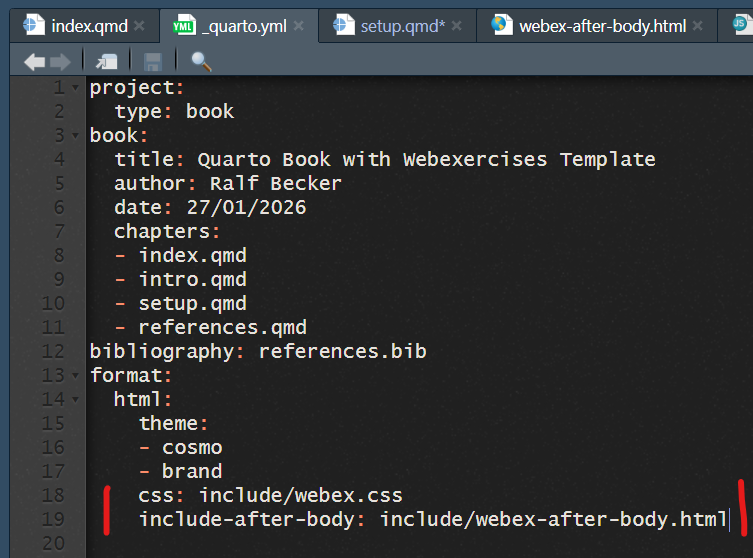
Make sure you save this new version.
2.12 Include webexercise elements
You are now in a position to actually include webexercise elements into your Quarto book. Open up one of the chapter “.qmd” files, say the pre-loaded “intro.qmd”.
In order to include such functionality in a chaper you need to load the webexercises R package. This is typically done in a hidden code junk (as you would normally not want your reader to see this background work). If you wanted it hidden you would replace #| echo: false with #| echo: true in the code junk below.
You need to do that at the beginning of every chapter file that uses webexwecise functionality.
From now on you would include webexercise elements as normal. For instance a multiple choice question:
How would you rate these instructions?
In reality you would hide the above code junk (#| echo: false).
Or you could include a hidden box.
This text is very secret and should only appear in a hidden box.
For a full understanding of the excellent webexercises functionality you should consult their guidance. Examples of how to make good use of such functionality in the context of coding instructions for Economics students you could also look at this example LINK to DEE2025.
2.13 Update, render and publish to Github
It is now time to render your book again, commit your changes to Github (master branch) and then publish (gh-pages branch). Here is the workflow at this stage.
2.13.1 Render updated version
In the RStudio Terminal type
quarto render --clean
2.13.2 Commit and push changes to Github
In the RStudio Terminal type
git add -A and ENTER
git commit -m "Commit message - ADJUST" and ENTER
git push and ENTER
this should update all the changes done.
2.13.3 Publish to gh-pages
In the RStudio Terminal type
quarto publish gh-pages and ENTER and “y” to confirm site update.
Check out the url to the page to confirm that all is working. Make sure that the webexercises elements actually work.
This book’s url is https://datasquad.github.io/QuartoBook-with-Webexercises-Template but, of course, your’s will have a different name.
2.14 Problems
The above is the result of an extensive dialogue with ChatGPT. And honestly I do not understand all the techicalities of the above solution.
However, given it eventually offered the solution, you may also have success if you carefully describe any problems you have.