Aim
This is a template you can use to create walkthroughs in Python. In any standard jupyter notebook you can mix text, code and code output. In this template we demonstrate how to incorporate the following items that are not necessarily standard
- how to include tabs which can be used to step-wise reveal instructions or solutions
- how to build in simple multiple-choice questions
- how to incorporate "FILL-THE-GAP" ecercises
- how to hide code
Much of the functionality comes from the pretty jupyter package. So before you work on these you will have to install this library in the usual way (say pip install pretty-jupyter in the Terminal).
The output will be a html file which you can share with students. Students will not need to have this package installed.
The way how you create the html file is to export it, however you will have to use a Terminal command to do that and cannot use the VS Code Export menu item. This document will show at the end how to create these html files.
The following line of code is needed to do some underneath the hood magic. Leave it in the code.
%load_ext pretty_jupyter
Jupyter Notebook Setup
A crucial part of working with Python is that you document your work by saving all the code commands you apply in either a script file (.py) or a Jupyter notebook (.ipynb).
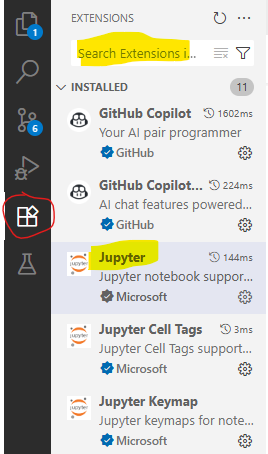
The functionality explained here extends Jupyter Notebook functionality. To be able to work with Jupyter notebooks you will have to add the Jupyter extension. If, when clicking on the Extension icon on the left hand side you do not see the Jupyter extension extension then type Jupyter into the Search box and follow the installation instruction. You can also look at this useful 6min YouTube video.
A Jupyter notebook allows you to save your commands (code), comments, and outputs in one document. The process that you need to follow consists of the steps outlined here:
- Create a new notebook by going to File → New File and then chose Jupyter Notebook.
- Give that file a sensible name and save it in your working directory (e.g., my_first_pywork.ipynb).
- Remember to frequently save your work (CTRL + S on windows or Cmd+S on a Mac).
Now, let's create a Jupyter Notebook file following the above mentioned steps. A Jupyter notebook basically consists of code and markdown blocks. markdown blocks, like the one in the image below, basically contain text and code blocks (see below) will contain python code. It is best to start with a markdown block in which you tell yourself what this notebook is about. Whether a block is code or markdown you can see at the bottom right of every block. You can change between the two types if you click the three dots in the top right of each block.
If you want a new block you click on either the + Code or the + Markdown button.
Standard Jupyter elements that may be useful
The following functionality is standard Jupyter notebook functionality
Code blocks
The main feature of jupyter notebooks is that you can interlace text/markdown blocks like this one, with code blocks, like the following:
# Import necessary libraries
import os as os # for operations at the operating system level
import pandas as pd # For data manipulation
import numpy as np # For numerical computations
Weblinks
This is an example of a weblink: Jupyter notebook guidance.
Image
You can include images. Make sure that you have the correct path to the image (relative to the directory in which your notebook is stored). It can be useful to create a folder for images.

Code embedding
You can present code inside the markdown boxes. You do that when you do not wish to have the code executed. This is a useful tool as you will see later. Here is an example:
a = 3
print("This code will not be executed")
LaTeX
You can use LaTeX in you notebooks. If you wish inline mathematics you do that by encaing the maths in dollar signs such as this: $\hat{y} = \hat{alpha} + \hat{\beta} x$.
If you wish to display a line of mathematics you do that with the begin/end equation command as you would in a tex document:
\begin{equation} \hat{y} = \hat{alpha} + \hat{\beta} x \end{equation}Embedding a YouTube video
You can embed a video into your notebook. The way that I could make work is the following bit of code (you could hide the code with the above technique). It requires you to import something from the IPython.display package.
Here 'Jp4h2zQeHbo' is the unique identifier for the particular video, and you can find it from any YouTube's video. The following video has the following url: "https://youtu.be/Jp4h2zQeHbo" and the last sequence of letters and numbers is the unique code for the video.
from IPython.display import HTML
YouTubeVideo('Jp4h2zQeHbo', width=800, height=300)
Non-standard workbook elements
Tabs
These are a feature of pretty jupyter and are not part of the standard jupyter notebook toolset.
These tabs can be used for a bunch of different purposes. But first here is the structure:
Heading
Tab 0
text 0
Tab 1
text 1
Tab 2
text 2
Tab 3
text 3
When creating a tab I would usually copy paste this base structure and then adjust it.
Below we show some use cases for tabs.
Hiding code cells
Sometimes you will not want to show some code to students. Perhaps because there is some complicated stuff being done which does not contribute to the learning for an intended session, but it is something that needs doing. Or you want students to struggle and find solutions then you may not want to show a particular code block, although you may need it to run (e.g. for some follow on work to function).
The way you can prevent a code block from showing is by adding a tag to a code block and then, when you render your notebook to a html file you can instruct the rendering process to not show that code.
So, here is a code block, which you will only see if you look at the "ipynb" file, but not when you look at the rendered "html" file you will not see it.
So, how do you add such a tag.
Click into the code cell you want to be hidden. Then click on the three little dots on the right hand side and then click on "Add Cell Tag".
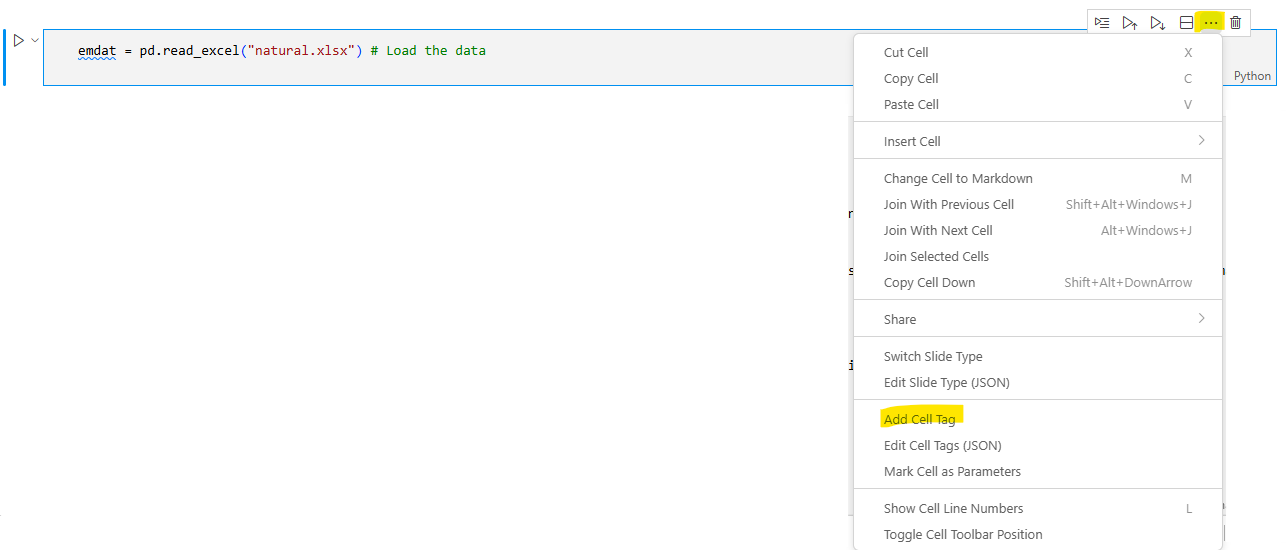
This will make a little pop-up appear (typically at the top of your screen)

You should now type "hide-input" (without quotation marks) into that window and press Enter. You will then see that this tag was added to the respective code block

To make the code block disappear you will have to instruct the rendering software to do that. But details on that at the end of this template.
Useful elements for a learner facing workbook
Showing error messages
Showing error messages is not necessarily straightforward as you cannot built faulty code into your notebook. However, you may want to expose your students to error messages and how to deal with these.
You may have to write faulty code and execute it while you are editing the file, take a screenshot, save that as a "png" file and then display the image like it is done here:
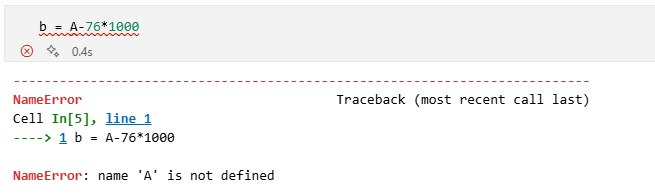
Alternatively you can give students faulty code inside a markdown cell and then ask them to execute it.
b = A - 76*1000
You will then have to guide them through the fixing of the error.
Explaining code, helping students read code
What does this line of code actually do?
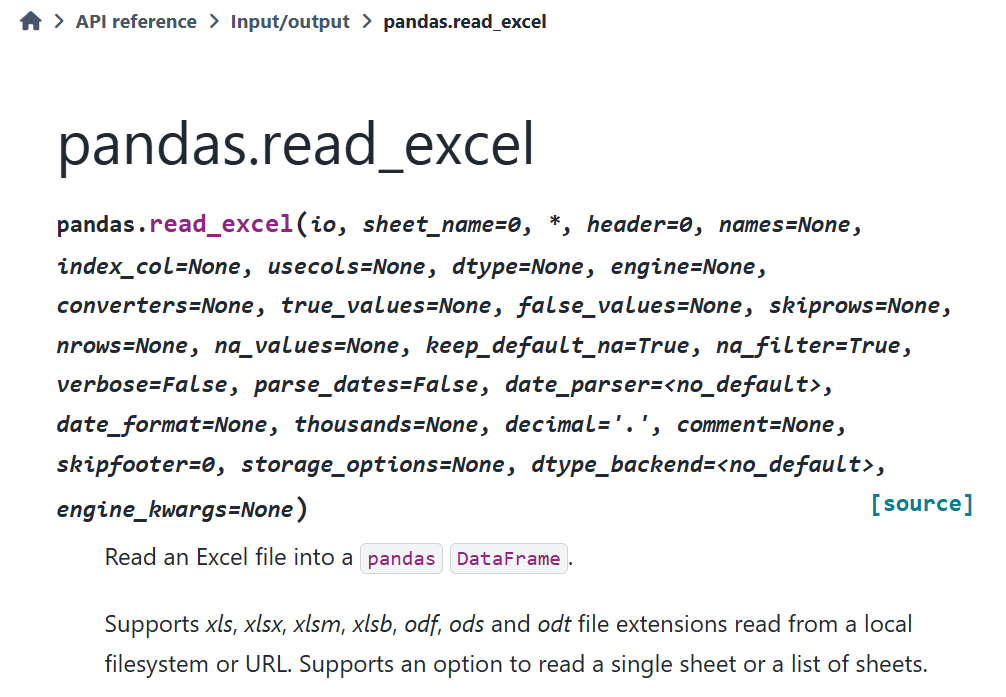
emdat = pd.read_excel("natural.xlsx")
Reading Code
It is extremely important to be able to read code and understand what it does. This is especially true in a world where we increasingly do not have to write code from scratch but have helpers at our hand that deliver code. But you need to remember that you are the quality control and are responsible for the code doing what you want it to do.
So what does the code do?
Here we are using the assignment operator = which tells Python to define a new object, here emdat, with whatever is on the right hand side of the assignment operator. On the right and side we are using the pd.read_excel function. As it uses the prefix pd. Python knows that it can find this function in the pandas library.
Functions are the bread and butter of working in Python or any other language. Hidden behind read_excel is a lot of code that achieves a particular purpose. Usually that code needs some input variable(s). These input variables are delivered in the parentheses directly after the function name. How many and what inputs are needed depends on the function. You can find details on that by looking at the function's documentation. A straightforward way of accessing that is to go to a browser and look for "Python read_excel" which will lead you to the documentation for the read_excel function.
The input is the path to the EXCEL file we wish to import. Note that the default path used is the working directory we set previously. The function does take that EXCEL file and converts it into a dataframe (think about it as the equivalent of a spreadsheet in Python) which then can be used in Python. Once you executed this line you should see emdat when you look at the "Jupyter variables".
How to read documentation?
In the previous tab you were advised to look at the documentation for the read_excel function. When you start out working with code these documentation files can be somewhat overwhelming. Let's look at the information you can get from the documentation for the read_excel function.
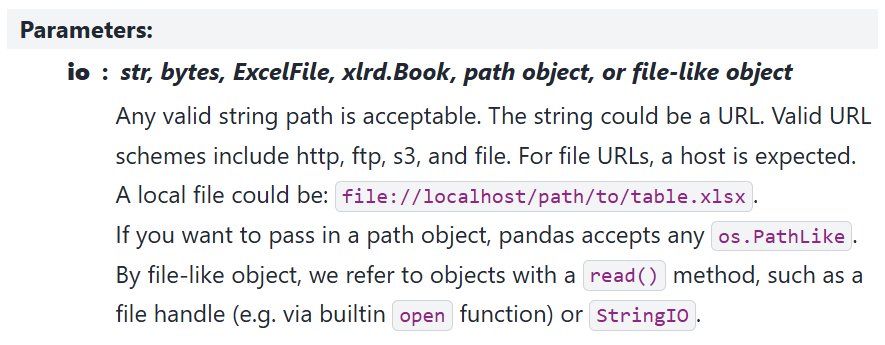
What you can see at the top of the documentation is the name of the function and a list of all the potential parameters the function will accept. It starts with "pandas.read_excel(io, ...)". To figure out what the first input is the function expects you can scroll down to the Parameters
From there you can perhaps infer that what is needed is a path to a file and Python expects this to be delivered as a string object. In our above function call this is "natural.xlsx". But as you can tell, the language is quite techy. What often helps is if you scroll further down to the Examples section of the documentation. There you will for instance find the following.
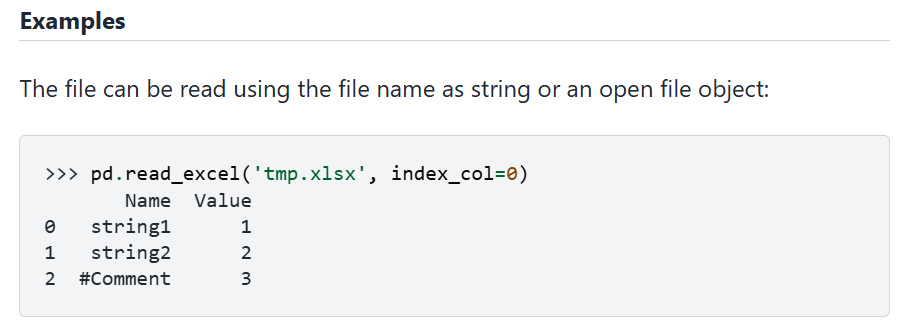
From here you can understand what is expected. In that example the file being imported is "temp.xlsx". In that example you can also see that a 2nd option is used ("index_col=0"). Let's find out what this is for. In the first image, where all parameters are listed in teh function call you can see that it says "index_col = none". This means that by default, i.e. when you do not call that parameter, it is set to "non". But what does it mean. To figure that out you go to the Parameters list to find the following entry for this parameter:
It refers to how to name the entries/rows in the dataframe. By default ("none") read_excel assumes that there are no row labels in the imported sheet and Python will automatically allocate labels 0, 1, 2, etc to the rows.
Complete the blank exercises
A very useful way to encourage learners to engage learners in the typical activities of a coder is to ask them to complete pieces of incomplete code. You can do that such that learners can eventually see the correct code or in a way that does not reveal the correct code, but does give learners the opportunity to verify that they have done the right thing.
no solution given
Here we present some incomplete code for students. We do that with code embedding as described above.
Complete the following code. You want to provide summary statistics for the 'No. Homeless' variable in emdat.
emdat['XXXX'].XXXX()
You get it right if you can replicate the following output.
count 2.491000e+03 mean 7.182261e+04 std 5.167507e+05 min 3.000000e+00 25% 5.010000e+02 50% 3.000000e+03 75% 1.671000e+04 max 1.585000e+07 Name: No. Homeless, dtype: float64
By adding the hide-input tag to the code you will ensure that the code is not displayed but the code does actually run.
Solution given
If you do wish to give the correct code you could hide it in a tab as follows. As above you could present the problem/task. This could be followed by the following.
Solution
Struggling
Having to find a correct way to solve a problem like the above is a bread and butter activity for any applied economist.
Hint
You could search for a solution, for instance by going to any search engine and search for "Python pandas summary statistics" or you could ask a LLM ("I am coding in Python. I have a dataframe called emdat with a variable called "No. Homeless". Can you show me how to do that).
Solution
This is one possible solution:
emdat['No. Homeless'].describe()
Advice on how to search for help
Searching for solutions to problems is a super important skill for students to learn. You can use the tabs to give students a problem, could be an incomplete code or a faulty code, and then use tabs as in the previous problem to give students hints and steps towards a solution.
Using successive tabs you could give increasingly detailed advice on how to use either google search or an LLM to get the right support for a particular problem. You could give advice on the right search terms and on how to prompt a LLM. At the end you could even link an interaction with, say, ChatGPT, to illustrate how to ask questions and how to use results. This can be useful to help learners how too formulate a small problem to an LLM on which it can help but then also understand that usually the solution needs adjusting (e.g. this interaction with ChatGPT to see how a well formulated query can deliver the solution to a query).
Multiple choice questions
In Jupyter notebooks there is no straightforward way to build visually and functionally appealing multiple choice questions. However, you can use the tabs described earlier for a simple implementation of multiple choice questions.
Revision
Question
Which of the following is correct?
- Working in Python is basically the same as working in Excel.
- In order to download and install Python you will have to pay an annual fee of £79.99.
- Lots of the functionality in Python comes through extra packages/libraries.
- The reason we prefer using VS Code to work in Python are the cool colour schemes available.
- When learning in Python I should expect to be proficient after about 1-2 hours of practice.
Solution?
Correct answer:
Lots of the functionality in Python comes through extra packages/libraries.
Rendering/Exporting the workbook
Once you have drafted your workbook you will have to render it to produce a html file which you can share with students. This file can then be shared with and viewed by students (also offline).
As we are using non-standard jupyter notebook functionality you got to use a special process to create this. After having saved your workbook you should go to the Terminal and use the following command to convert the "ipynb" file to a "html" file.
Here is the command that was used to render this file.
jupyter nbconvert --to html --template pj --TagRemovePreprocessor.enabled=True --TagRemovePreprocessor.remove_input_tags hide-input python_workbook_template.ipynb
It is not really important to understand everything. If you look in the Pretty Jupyter documentation you will find the following rendering command:
jupyter nbconvert --to html --template pj python_workbook_template.ipynb
That will work if you do not use any hidden code block functionality. But if you wish to use hidden code blocks you will have to use the former longer call. The only thing you will have to change is the name of the "ipynb" file name.
After pressing ENTER you should find a html version of your file in your folder. In our case that is "python_workbook_template.html".